X
Welcome to Ceramic Review
Ceramic Review is the magazine for contemporary and historical ceramics, ceramic art and pottery.
Ceramic Review Issue 340
July/August 2026
Ceramic Review is the magazine for contemporary and historical ceramics, ceramic art and pottery.
July/August 2026
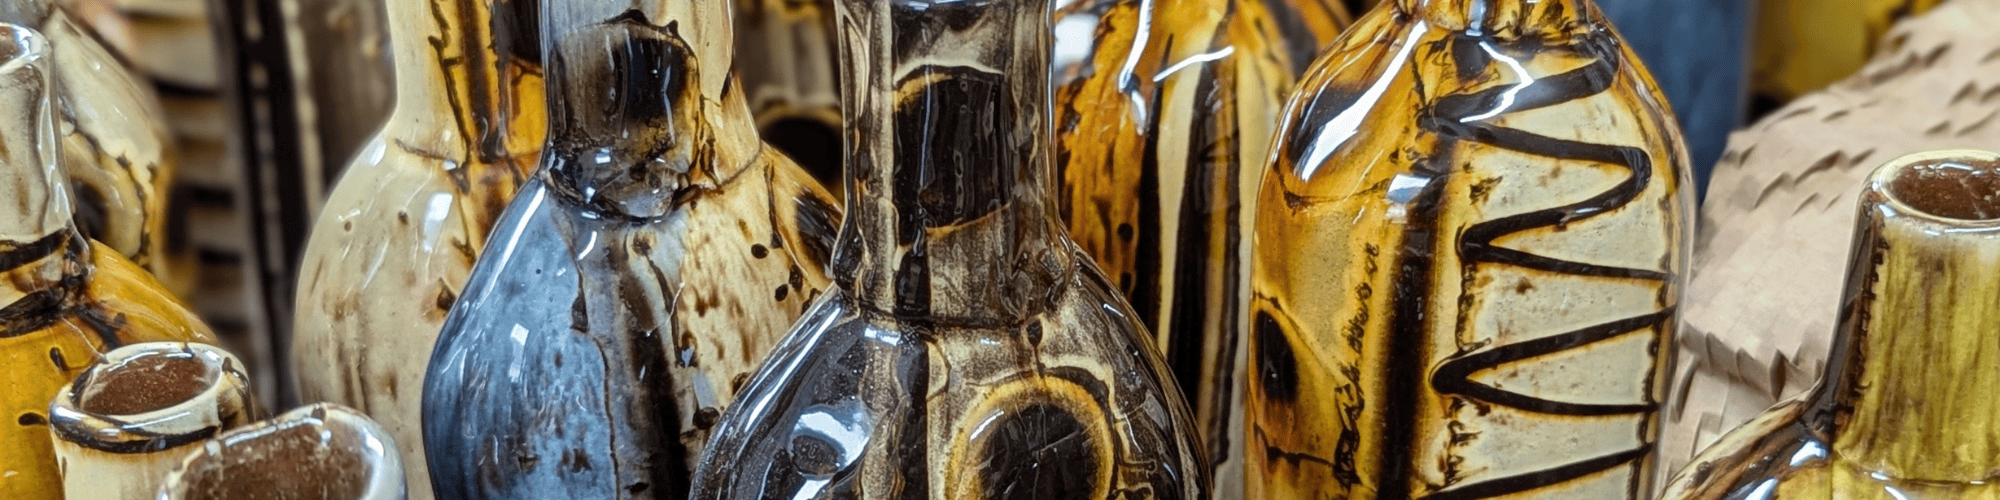
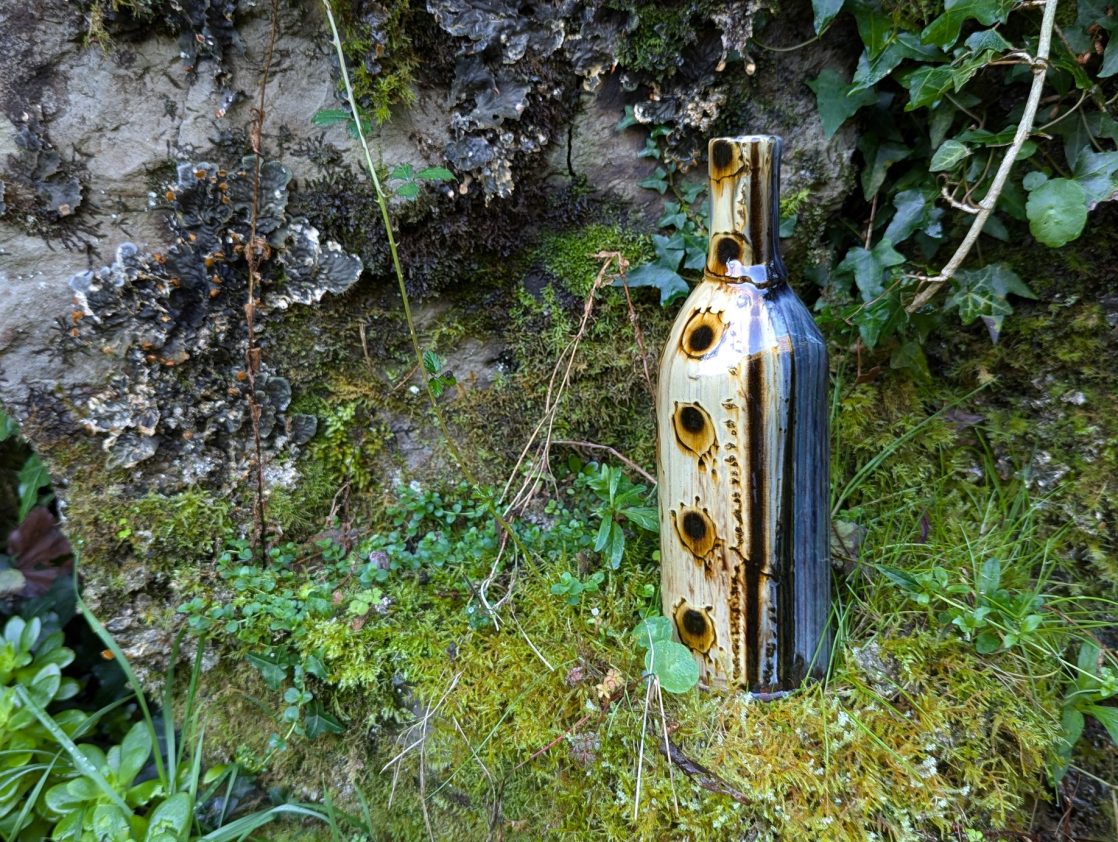
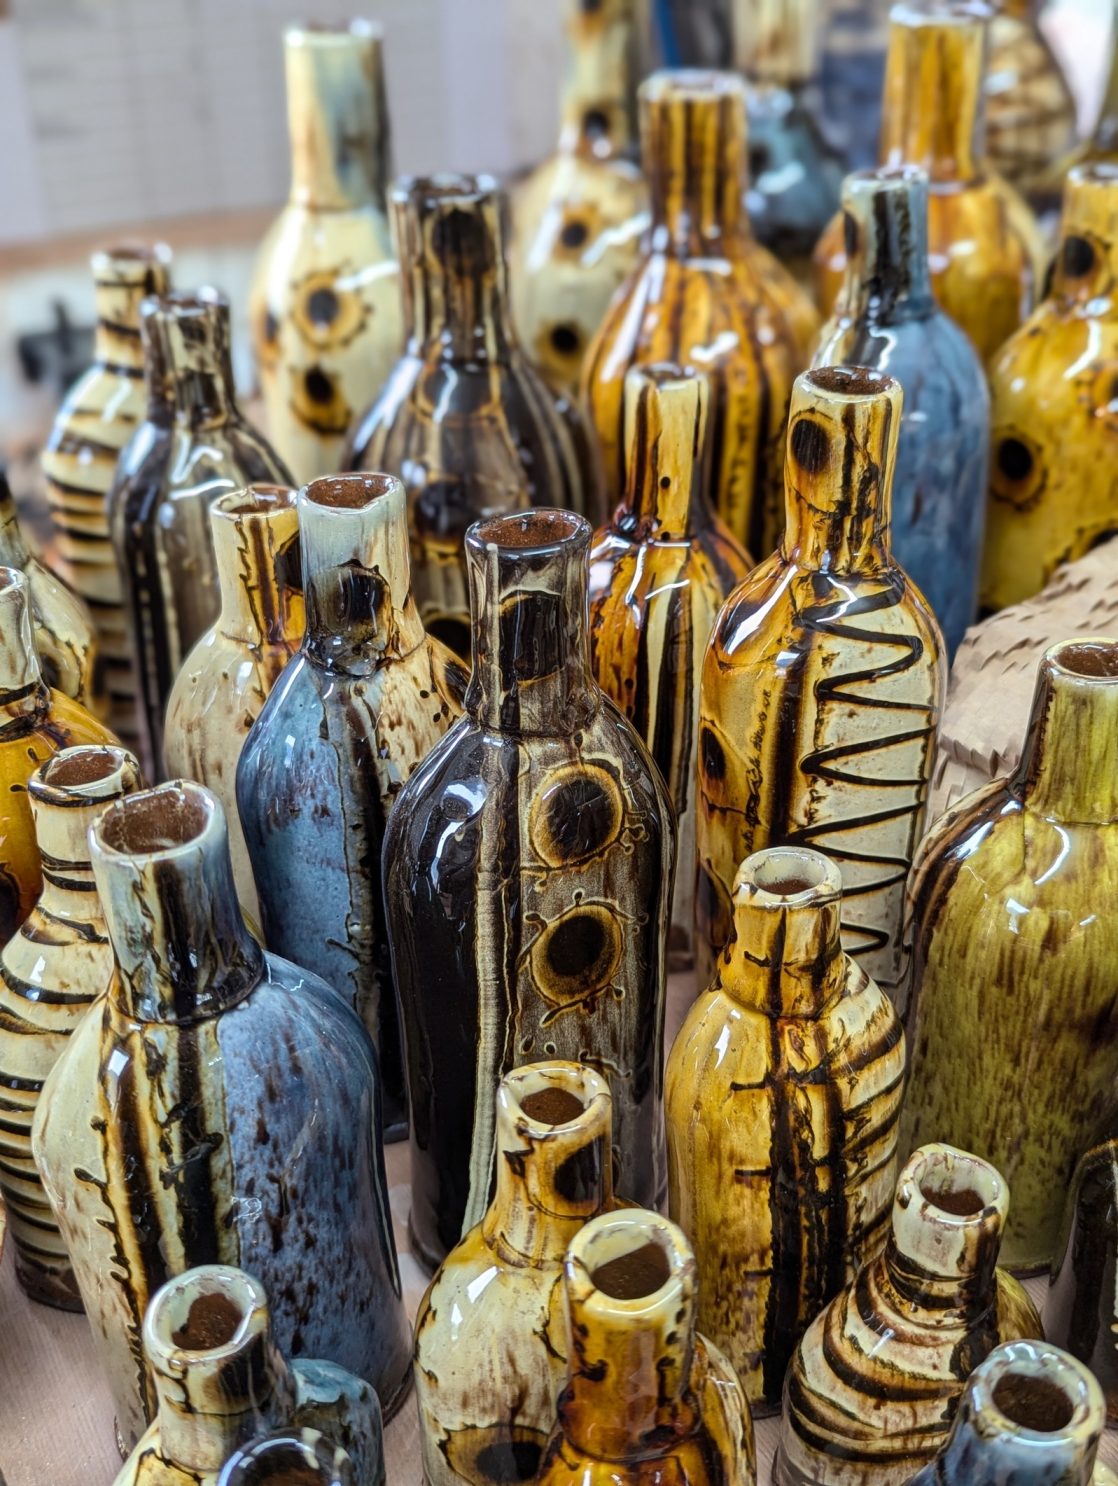
Russell Kingston reveals the process behind his glazed red-grogged terracotta bottles
I started making my own bottles after obtaining a similar one made by Jean-Nicolas Gérard. I immediately wanted to use Gérard’s bottle and felt that it needed to be on a summer table outside filled with ice cold water or wine. His version looked to be thrown in two parts – base and walls attached to the shoulder and neck. I didn’t want to copy it, but I loved the simplicity of a chunky straight-sided bottle, so I decided to use an extruder (which I had been using to make bud vases) and made my own versions. I hope they have the same feel of Gérard’s bottle but with my own hands.
CLAY AND MAKING TECHNIQUES
This bottle is the result of a few years of making them this way. It is made with red grogged terracotta from Commercial Clay Ltd. I have used most of the standard terracottas from the major clay manufacturers but found this to be the most consistent in moisture content and cost-effective too. It fires from orange through red to a lovely deep purple as it gets hotter. I use terracotta because I work in the slipware tradition and I like the warmth it adds to my work.
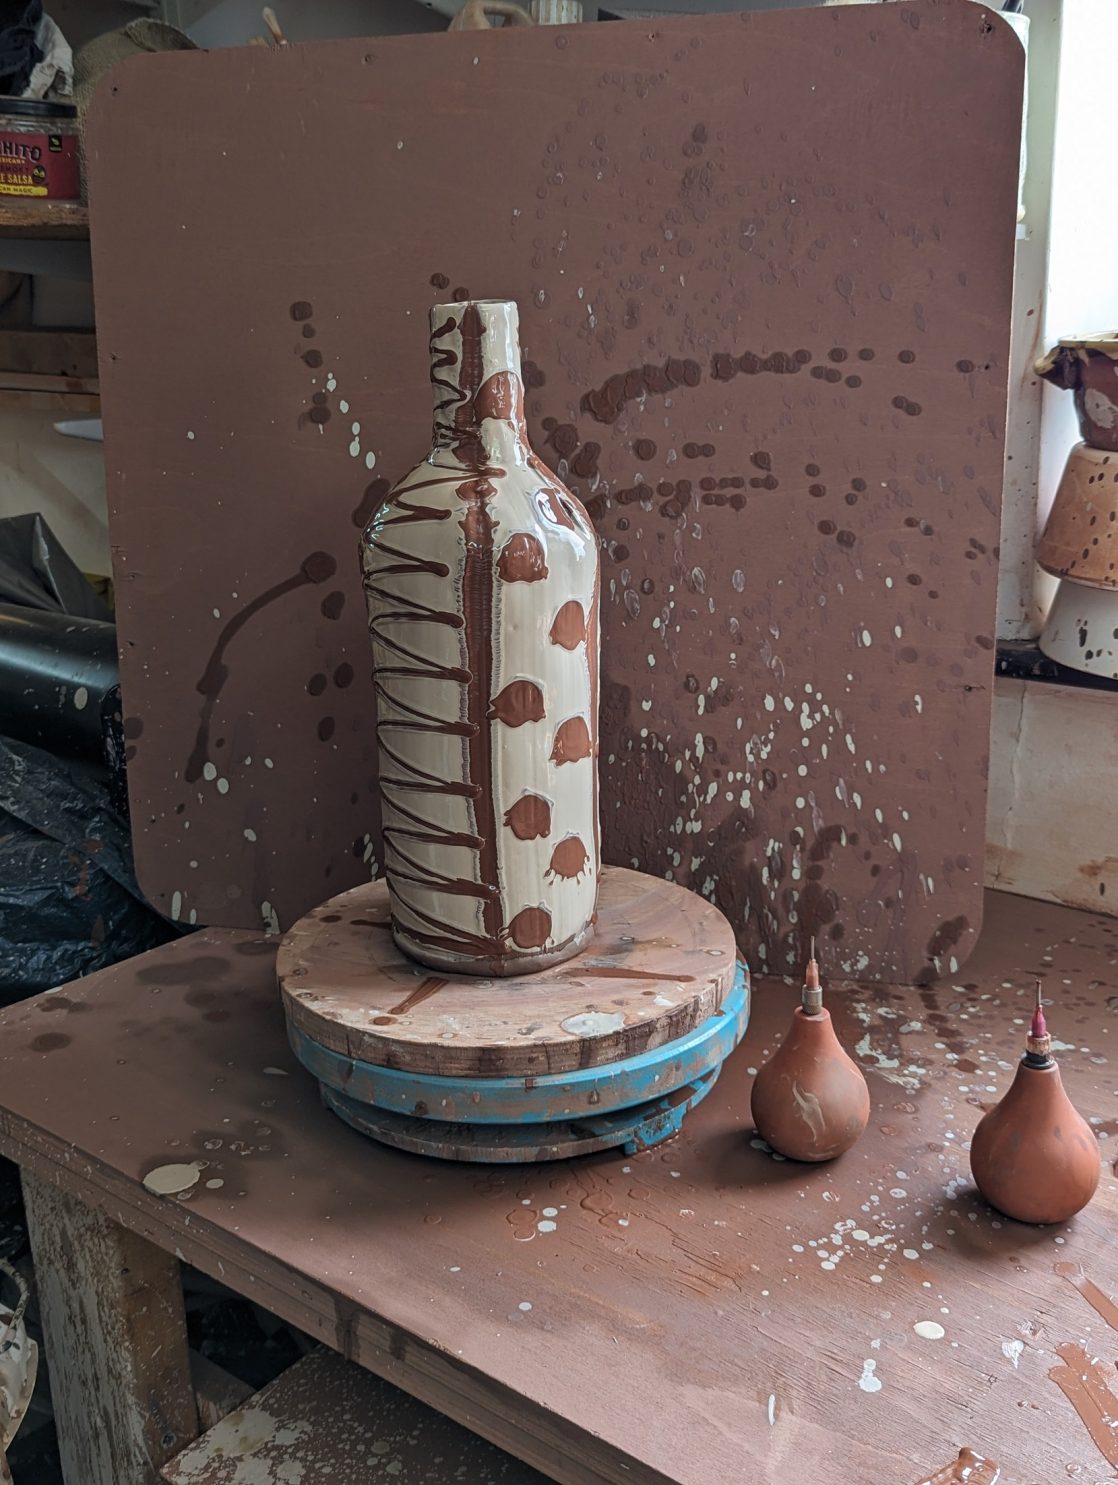
With a big extruder, I extrude pipe blanks. I extrude about 15-20 lengths at a time and stand them on the bench for a bit to firm up. I cut down a few of these lengths on one side and open them up flat on the bench – these become my slabs, which I use to make the base and the necks. I do this so that they have the same extruded texture and are the same thickness as the rest of the bottle.
I cut sections of the pipe blanks that I want for the body, keeping the top and bottom cuts parallel. I then put four V-shaped dart cuts in the top and paddle these over each other with some slip, which creates the shoulder. The joints of the darts are left as features of how the bottle is made. I then cut a rectangle out of the slab (I use my knife to measure the size) and finish the rim edge by smoothing it with my finger and a bit of water. I use an angle cutter and cut an opposite 45˚ angle to each side so that it becomes a seamless cylinder when I shape it around a piece of dowel. This is then attached to the body as the neck and top of the bottle.
To create the base, I score and slip the bottom of the bottle and attach it to a big slab, I then cut around it leaving an overlap. On the whirler, I cut a 45˚ angle by hand, leaving a small overlap, which I fold over the join and smooth with my thumb. The bottle is then left to go leatherhard before it is slipped.
GLAZING AND DECORATION
When the bottle is leatherhard, I pour white slip all over it excluding the base and then let the bottle sit for a minute or two before I decorate it with black slip coloured with iron and manganese from a slip trailer. I apply two vertical black lines halfway round the bottle on each side, then lift the bottle into a horizontal position and drip drops of black slip on one side, which creates the dots. The bottle is left to go bone dry and then bisque-fired. I then glaze it half transparent blue and half transparent cream with the black slip lines as my guide. I always glaze with the neutral cream and one colour as the cream makes the colour more vibrant compared to the same bottle if it was all blue.
FIRING SCHEDULE
This bottle was fired in my gas down-draft kiln to 1120˚C in an oxidation atmosphere. The blue looks its best when it is fired with a slight bit of atmosphere as opposed to when it is fired in the electric kiln.
My kiln is big (135 cu ft), so it is fired really slowly and takes about 28-30 hours in total. I have found that the long firing gives me the most even chamber and the best pots, while using the least amount of gas. I could fire it a lot faster by not using reduction (which would ruin my pots) but the whole chamber is very uneven, so slow and steady gives me the results I am after. I do 2-3 firings a year and it is enough for the whole year.
I am very happy with how this bottle turned out. The slip is just thin enough to let a bit of the red clay show through to deepen the colours. On the blue side it adds a purple hue in places and on the cream side it adds a rich warmth to the already warm colour. The oxides have bled just right leaving a toasty brown shadow to the slip decoration. Finally, the clay body has matured to a deep red that edges on purple, all of which adds to the warm feeling, which is great because blues can be quite cold and I am not going for cold with my work.
For more details visit russellkingstonceramics.co.uk; @russellkingstonceramics